2. Installation process
OnTask is a Web application that manages data about learners to offer them personalized support. For this reason the installation process complies with a set of tight security restrictions. Some of these restrictions lie within the scope of the tool, but others are part of the environment in which the application is installed. We strongly recommend to install OnTask in a web server that uses TTL encryption (HTTPS) to serve all the pages. The application requires exchanging sensitive information about your session with the browser, so the information should be encrypted.
2.1. Requirements
OnTask has been developed as a Django application. Django is a high-level, python-based web framework that supports a rich set of functionality typically required in applications like OnTask. But as with many other applications, OnTask requires a set of additional applications for its execution:
- Python 2.7 and Python 3.6
- Django 2.1.4
- Additional Django modules (included in the requirements/base.txt) file
- Redis
- PostgreSQL (version 9.5 or later)
Some of these requirements are handled through Python’s package index application pip.
2.2. Are you upgrading from a version < 2.8 to 2.8 or later?
If you are upgrading OnTask from a version lower than 2.8 to 2.8 or later, you need to disable the crontab used to execute tasks asynchronously from the web server. Starting in version 2.8 those tasks are executed by an application called celery that is managed using supervisor (see Configure the Distributed Task Queue Celery).
2.3. Are you upgrading from version < 4.0 to 4.0 or later?
The upgrade to 4.0 or later requires version 2.7 and 3.6 both installed and available in the system. Django versions 2.0 and later require Python 3 but certain additional libraries used by OnTask have not been fully ported yet and still require the use of Python 2.7. Make sure both versions are available before proceeding to the upgrade.
2.4. Installing the required tools
The following installation steps assume that you are deploying OnTask in a production web server capable of serving pages using the HTTPS protocol.
2.4.1. Install and Configure Redis
Django requires Redis to execute as a daemon in the same machine to cache information about the sessions. No specific changes are required in the code, simply have the server running in the background.
Download and install redis.
Follow the instructions to configure it to be used by Django.
Test that it is executing properly in the background (use the
pingcommand in the command line interface.
2.4.2. Install and Configure PostgreSQL
Download and install postgresql.
Create the role
ontaskwith the commandcreateuser. The role should be able to create new databases but not new roles and you should define a password for the user (usecreateuser --interactive -W).Adjust the access configuration in postgresql (in the configuration file
pg_hba.conf) to allow the newly created user to access databases locally.Create a new database with name
ontaskwith thecreatedbcommand.Use the client application
psqlto verify that the user has access the newly created database and can create and delete a new table and run regular queries. Test the connection with the following command:psql -h 127.0.0.1 -U ontask -W ontask
If the client does not connect to the database, review your configuration options.
2.4.3. Install Python (2.7 and 3.6)
In the following sections we assume that you can open a command line interpreter and you can execute the two python interpreters for versions 2.7 and 3.6.
- Install python
- Verify that the two python interpreters can run and have each the right version (2.7 and 3.6) using the command line interpreter (typically
python --versionorpython3 --version). - Install pip (the package may be called
python-pipfor Python 2.7 andpython3-pipfor Python 3.6). This tool will be used by both Python and Django to install additional libraries required to execute OnTask.
2.4.4. Download, install and configure OnTask
Download or clone a copy of OnTask.
Using a command interpreter, go to the OnTask folder and locate a folder inside it with name
requirements. Verify that it contains the filesbase.txt,production.txtanddevelopment.txt. The first file contains a list of python modules that are required by OnTask. The second is a set of additional modules to run a production instance, and the third is the same list if you intend to run a development instance.If you plan to run a production instance of OnTask execute the command (you may need administrative privileges to execute this command):
pip3 install -r requirements/production.txt
Alternatively, if you plan to run a development instance of OnTask, execute the command:
pip3 install -r requirements/development.txt
This command downloads a set of libraries and modules and installs them as part of the python libraries in the system.
At this point you have the major modules in place. The next steps include the configuration of the Django environment to run OnTask. If you plan to install a development instance of OnTask, using a plain text editor (nano, vim, Emacs or similar) in a command line interpreter, open the file manage.py in the src folder of the project. Modify line 10 replacing the value "ontask.settings.production" by "ontask.settings.development". Save and close the file.
Using the same plain text editor create a file with name local.env in the folder src/ontask/settings with the following content (note there is no space between variable names and the equal sign):
DEBUG=False
TIME_ZONE=[YOUR LOCAL PYTHON TIME ZONE]
BASE_URL=''
DOMAIN_NAME=[YOUR DOMAIN NAME]
SHOW_HOME_FOOTER_IMAGE=True
# syntax: DATABASE_URL=postgres://username:password@127.0.0.1:5432/database
DATABASE_URL=postgres://[PSQLUSERNAME]:[PSQLPWD]@127.0.0.1:5432/ontask
REDIS_URL=[YOUR REDIS URL]
SECRET_KEY=
#
# LTI
#
LTI_OAUTH_CREDENTIALS=test=secret,test2=reallysecret
Open a command interpreter and execute the following python command:
python -c 'import tzlocal; print(tzlocal.get_localzone().zone)'
Replace
[YOUR LOCAL PYTHON TIME ZONE]in thelocal.envfile by the description of your time zone produced by the previous command.If OnTask is going to be served from a location different from the root of your server (for example
myhost.com/ontask, then modify the value of the variableBASE_URLwith the suffix that should follow the domain name (in the example,/ontask).Modify the line starting with
DOMAIN_NAME=and change the field[YOUR DOMAIN NAME] with the domain name of the machine hosting OnTask.If you want to disable the appearance of the banner image in the login page set the value of the variable
SHOW_HOME_FOOTER_IMAGEto False.Modify the line starting with
DATABASE_URL=and change the field[PSQLUSERNAME]with the name of the Postgresql user created in the previous step (the one that could access the ontask database and run queries). If you decided to use a different name for the database, adjust the last part of the line accordingly (replace ontask by the name of your database).Replace the string
[YOUR REDIS URL]with the URL where Redis can be accessed. This is typically something similar toredis://127.0.0.1:6379/1.Open a command interpreter and execute the following python command:
python3 -c 'import random; import string; print("".join([random.SystemRandom().choice(string.digits + string.ascii_letters + string.punctuation) for i in range(100)]))'
Copy the long string produced as output and add it at the end of the last line of the file
local.env. It should look something like (with different content after the equal sign):SECRET_KEY=4o93jf0572094jv...
Modify the line starting with
LTI_OAUTH_CREDENTIALSand include a comma-separated list of pairs key=secret for LTI authentication. See the section Authentication for more details about this type of authentication.Create a new folder with name
logsin the OnTask top folder (next to therequirementsfolder). This folder is different from the folder with the same name in thesrcfolder.If at some point during the following steps you want to reset the content of the database, run the commands
dropdbandcreatedbexplained in Install and Configure PostgreSQL.Execute the following command from the
srcfolder to create the database internal structure:python3 manage.py migrate
A few messages should appear on the screen related to the initialization of the database.
Execute the following command to upload to the platform some initial data structures:
python3 manage.py runscript -v1 --traceback initial_data
The command should run without any error or exception. If you need to create additional users before deploying the platform, read the section Creating users in Bulk.
Execute the command to create a superuser account in OnTask:
python3 manage.py createsuperuser
Remember the data that you enter in this step so that you use it when you enter OnTask with your browser.
Go to the
docs_srcfolder to generate the documentation. Make sure this folder contains the sub-folders with name_staticand_templates. Execute the command:make clean html copy_to_docs
The documentation is produced by the
sphinx-docapplication and generates the directory_buildwhich is then created to the folder../docsfolder.From the
srcfolder execute the following command to collect and install the static content:python3 manage.py collectstatic
If you are running a production instance, execute the following command to check the status of the platform:
python3 manage.py check --deploy
The command should print just one warning about the configuration variable X_FRAME_OPTIONS. If you are running a development instance, you will get various additional warning that are derived most of them from running the instance without HTTPS.
Execute the following command to start the OnTask server:
python3 manage.py runserver
If there are no errors, the message on the screen should say that your server is running in the url 127.0.0.1:8000. However, if you open your browser in that URL, an error will be shown. This error is normal and it is because the production version requires the pages to be served through SSL with a valid certificate in a conventional server.
If OnTask is going to be accessed through a web server like Apache or Nginx, stop the application and configure the web server accordingly.
If you want to use the server in development mode through the URL
127.0.0.1:8000you have to perform two more steps. First, edit the filemanage.pyand change these three lines to look like:os.environ.setdefault("DJANGO_SETTINGS_MODULE", "ontask.settings.development")
Second, execute the following command from the
srcfolder:pip3 install -r requirements/development.txt
Now, the command:
python3 manage.py runserver
will start the server in the URL 127.0.0.1:8000 and you should be able to access it normally with the browser.
Warning
The development version of OnTask is not suited to be used in production because it disables several security features. Make sure you only deploy a production version.
2.4.5. Configure the Distributed Task Queue Celery
There are various tasks that need to be executed by OnTask outside the web server. The solution adopted is to use Celery, Supervisor (a process control system) and Redis. Redis has been configured in a previous step. This section explains how to set up the distributed task queue and make sure it is continuously executing in parallel with the web server.
Install the application
supervisorusing pip2. This application makes sure the application Celery is continuously running in the background and in communication with the server. As of now, the application can only run through Python 2 (an upgrade in the future may remove this anomaly). For this reason, the package has to be installed with the following command (using Python 2.7):pip2 install supervisor
Check that the binaries
supervisord,supervisorctlandceleryare installed in your system.Go to the folder
supervisorin the top of the project and edit the filesupervisor.conf.The file configures
supervisordto run in the background and prepare two sets of processes for OnTask. You have two options to use this file:Use environment variables.
The file uses internally the value of two environment variables:
PROJECT_PATH: Full path to the root of the project (the top folder containing the fileLICENSE.CELERY_BIN: Full path to the executableceleryin your system (typically/usr/local/bin/celeryor similar).Set these variables in your environment to the correct values and make sure they are properly exported and visible when running other commands. For example, in
bash, this operation would be achieve by two commands similar to:$ export PROJECT_PATH=/full/path/to/OnTask/root/folder $ export CELERY_BIN=/full/path/to/celery/executable
Change the file
supervisor.conf.- replace any appearance of the string
%(ENV_PROJECT_PATH)sby the full path to the project folder. - replace any appearance of the string
%(ENV_CELERY_BIN)sby the full path to thecelerybinary program.
- replace any appearance of the string
Start the process control system with the command:
$ supervisord -c supervisor.conf
The command starts the process control application
supervisordwhich executes a set of process in the background.Check that the process control system is working with the command (executed from the
supervisorfolder):$ supervisorctl -c supervisor.conf status
The output of this command should show a message similar to:
ontask-beat-celery               RUNNING   pid 28579, uptime 1 day, 0:07:36
ontask-celery                    RUNNING   pid 28578, uptime 1 day, 0:07:36
If the status of the two processes is
STARTINGwait a few seconds and execute the command again. The namesontask-beat-celeryandontask-celeryare the names of the two processes that OnTask uses for asynchronous task execution.You may use this command to check if
supervisordis still running. The application is configured to write its messages to the filecelery.login the logs folder at the top of the project.If you are upgrading OnTask from a previous version (less than 2.8), you need to edit the
crontabentry and remove the command to execute the scriptscheduler_script.py.
2.5. Upgrading OnTask
If you have OnTask already configured and running, here are the steps to follow to upgrade to a new version. If you are upgrading from a version below 2.8 to 2.8 or higher read Configure the Distributed Task Queue Celery.
If you are upgrading from a version below 4.0, make sure that:
- Versions 2.7 and 3 of Python are properly installed.
- The library
Celeryis installed as part of the Python 3 system and the binary is executed using Python 3. - The library
supervisordis installed as part of the Python 2.7 system and the binary is executed using Python 2.
After verifying the previous requirements, proceed with the following steps.
Create a backup of the database to be able to restore the state of the tool before the upgrade process.
Stop the apache web server.
Open a terminal and use a command interpreter to execute the following commands.
Place the interpreter in the project folder (the one with the folder
srcin it)Pull the code for the new version from the repository:
git pull
Refresh the list of requirements:
pip install -r requirements/production.txt
Go to the sub-folder containing the tool documentation:
cd docs_src
Re-create the tool documentation and place it in the appropriate folder:
make clean html copy_to_docs
Go to the sub-folder containing the apps:
cd ../src
Collect all files to be served statically:
python manage.py collectstatic
Apply the migrations to the database:
python manage.py migrate
Check that the configuration is ready to run:
python manage.py check --deploy
Restart the
supervisordconfiguration:supervisorctl -c ../supervisor.conf reload
Restart the apache web server and check the new version is properly installed.
2.6. The Administration Pages
OnTask uses the administration pages offered by Django. The account created with
the command createsuperuser has complete access to those pages through a
link in the upper right corner of the screen.
These pages offer access to several important operations:
- The elements of each of the models stored in the database (workflows, actions, conditions, columns, etc). Each model has its corresponding page allowing the creation, update and deletion of any object.
- The user information. This is a special model representing the users, their name, credentials, etc. The platform allows the creation of user accounts.
- The group information. The platform differentiates users based on groups. Each group has different functionalities.
Once the instance is running, visit these pages and configure the platform to your needs.
2.7. Production Deployment
Once OnTask is executing normally, you may configure a web server (nginx, apache or similar) to make it available to a community of users. The instructions to make such deployment are beyond the scope of this manual but are available through the corresponding manual pages of these applications.
2.8. Authentication
OnTask comes with the following authentication mechanisms: IMS-LTI,
REMOTE_USER variable, basic authentication, and LDAP. The first three
(IMS-LTI, REMOTE_USER and basic authentication) are enabled by default and used in that order whenever an unauthenticated request is received. It follows a brief description of how to configure them.
IMS Learning Tools Interoperability (IMS-LTI). LTI is a standard developed by the IMS Global Learning Consortium to integrate multiple tools within a learning environment. In LTI terms, OnTask is configured to behave as a tool provider and assumes a tool consumer such as a Learning Management System to invoke its functionality. Any URL in OnTask can be given to the LTI consumer as the point of access.
Ontask only provides two points of access for LTI requests coming from the consumer. One is the URL with suffix
/lti_entryand the second is the URL provided by the actions to serve the personalized content (accessible through theActionsmenu.To allow LTI access you need:
A tool consumer that can be configured to connect with OnTask. This type of configuration is beyond the scope of this manual.
A set of pairs key,value in OnTask to be given to the tool consumers so that together with the URL, they are ready to send the requests. The key/value pairs need to be included as an additional variables in the file
local.envin the foldersrc/ontask/settingstogether with other local configuration variables. For example,LTI_OAUTH_CREDENTIALS=key1=secret1,key2=secret2
If you change the values of this variable, you need to restart the server so that the new credentials are in effect.
This authentication has only basic functionality and it is assumed to be used only for learners (not for instructors).
REMOTE_USER. The second method uses the variable REMOTE_USER that is assumed to be defined by an external application. This method is ideal for environments in which users are already authenticated and are redirected to the OnTask pages (for example, using SAML). If OnTask receives a request from a non-existent user through this channel, it automatically and transparently creates a new user in the platform with the user name stored in theREMOTE_USERvariable. OnTask relies on emails to identify different user names, so if you plan to use this authentication method make sure the value ofREMOTE_USERis the email.Additionally, this mode of authentication will be enforced in all requests reaching OnTask. However, this configuration prevents the recording of email reads. Read the section Email Configuration to configure the server to allow such functionality to be properly configured.
Basic authentication. If the variable
REMOTE_USERis not set in the internal environment of Django where the web requests are served, OnTask resorts to conventional authentication requiring email and password. These credentials are stored in the internal database managed by OnTask.
The API can be accessed using through token authentication. The token can be generated manually through the user profile page. This type of authentication may need some special configuration in the web server (Apache or similar) so that the HTTP_AUTHORIZATION header is not removed.
2.8.1. LDAP Authentication
OnTask may also be configured to use LDAP to authenticate users. This is done through the external package django-auth-ldap. In its current version, this authentication mode cannot be combined with the previous ones (this requires some non-trivial code changes). The following instructions describe the basic configuration to enable LDAP authentication. For more details check the documentation of the django-auth-ldap module.
Stop OnTask (if it is running)
Make sure your server has installed the development files for OpenLDAP. In Debian/Ubuntu, the required packages are:
libsasl2-dev python-dev libldap2-dev libssl-dev
In RedHat/CentOS:
python-devel openldap-devel
Install the module
django-auth-ldapEdit the configuration file
local.envand add the following two variable definitions:AUTH_LDAP_SERVER_URI=[uri pointing to your ldap server] AUTH_LDAP_PASSWORD=[Password to connect to the server]
Edit the file
src/ontask/settings/base.pyand uncomment the lines that import theldaplibrary (import ldap) and the lines that import three methods from thedjango_auth_ldap.configmodule (LDAPSearch,GroupOfNamesTypeandLDAPGroupQuery)Locate the section in the file
src/ontask/settings/base.pythat contains the variables to configure LDAP AUTHENTICATION.Uncomment the ones needed for your configuration. Make sure all the information is included to connect to the server, perform the binding, search, and if needed, assign fields to user and group attributes.
Locate the variable
AUTHENTICATION_BACKENDSin the same file.Comment the lines referring to the back-ends
LTIAuthBackendandRemoteUserBackend.Uncomment the line referring to
LDAPBackend.Make sure the LDAP server contains the data about the users in the right format
Start the OnTask server.
2.9. Email Configuration
OnTask relies on the functionality included in Django to send emails from the application. The following variables must be defined in the file local.env:
EMAIL_HOST: Host providing the SMTP service,EMAIL_PORT: Port to communicate with the host,EMAIL_HOST_USER: User account to log into the email host,EMAIL_HOST_PASSWORD: Password for the account to log into the email host,EMAIL_USE_TLS: Boolean stating if the communication should use TLS,EMAIL_USE_SSL: Boolean stating if the communication should use SSL,EMAIL_ACTION_NOTIFICATION_SENDER: Address to use when sending notifications,EMAIL_BURST: Number of consecutive emails to send before pausing (to adapt potential throttling of the SMTP server)EMAIL_BURST_PAUSE: Number of seconds to wait between bursts.
An example of configuration is:
EMAIL_HOST=smtp.yourinstitution.org
EMAIL_PORT=334
EMAIL_HOST_USER=mailmaster
EMAIL_HOST_PASSWORD=somepassword
EMAIL_USE_TLS=False
EMAIL_USE_SSL=False
EMAIL_ACTION_NOTIFICATION_SENDER=ontaskmaster@yourinstitution.org
EMAIL_BURST=500
EMAIL_BURST_PAUSE=43200
Set theses variables in the configuration file to the appropriate values before starting the application. Make sure the server is running in production mode. The development mode is configured to not send emails but show their content in the console instead.
2.9.1. Tracking Email Reads
If OnTask is deployed using SAML, all URLs are likely to be configured to go through the authentication layer. This configuration prevents OnTask from receiving the email read confirmations. In this case, the web server needs to be configured so that the SAML authentication is removed for the URL trck (the one receiving the email read tracking). In Apache, this can be achieved by the following directive:
<Location /trck>
  Require all granted
</Location>
If OnTask is not served from the root of your web server, make sure you include the absolute URL to trck. For example, if OnTask is available through the URL my.server.com/somesuffix/ontask, then the URL to use in the previous configuration is my.server.com/somesuffix/ontask/trck.
2.10. Canvas Email Configuration
OnTask allows to send personalized emails to the user inbox in an instance of a Canvas Learning Management System using its API. Configuring this functionality requires permission from Canvas to access its API using OAuth2 authentication. Once this authorization is obtained, the following variables need to be defined in the file local.env configuration file:
CANVAS_INFO_DICT: A dictionary with elements pairs containing the identifier for a Canvas instance that will be shown to the user and a dictionary with the following configuration parameters:domain_port: A string containing the domain and port (if needed) of the Canvas host.client_id: This value is provided by the administrator of the Canvas instance once permission to use the API has been granted.client_secret: This value is provided together with theclient_idonce the permission to use the API is granted. It is typically a large random sequence of characters.
authorize_url: URL template to access the first step of the authorization. This is usuallyhttps://{0}/login/oauth2/auth. The string{0}is replaced internally with the value ofdomain_port.access_token_url: URL template to access the token. This is usuallyhttps://{0}/login/oauth2/token. The string{0}is replaced internally with the value ofdomain_port.
conversation_URL: Similar to the previous two values, it is the entry point in the API to create a conversation (equivalent to send an email). This is usuallyhttps://{0}/api/v1/conversations. The string{0}is replaced internally with the value ofdomain_port.aux_params: A dictionary with additional parameters. The dictionary may include a value for the keyburstto limit the number of consecutive API invocations (to prevent throttling) and a value for the keypausewith the number of seconds to separate bursts. Here is an example of the definition of this variable in thelocal.envfile:CANVAS_INFO_DICT={"Server one": {"domain_port": "yourcanvasdomain.edu", "client_id": "10000000000001", "client_secret": "YZnGjbkopt9MpSq2fujUOgbeVZ8NdkdCeGF2ufhWZdBKAZvNCuuTOWXHotsWMu6X", "authorize_url": "http://{0}/login/oauth2/auth", "access_token_url": "http://{0}/login/oauth2/token", "conversation_url": "http://{0}/api/v1/conversations", "aux_params": {"burst": 10, "pause": 5}}}
CANVAS_TOKEN_EXPIRY_SLACK: The number of seconds to renew a token before it expires. For example, if the variable is 300, any API call performed with a token five minutes before it expires will prompt a token refresh. Here is an example of such definition inlocal.env:CANVAS_TOKEN_EXPIRY_SLACK=300
After defining these variables, restart the application for the values to be considered. To test the configuration open a workflow, create an action of type Personalized canvas email and email those messages.
2.11. Plugins
OnTask allows also the inclusion of arbitrary Python modules to execute and transform the data stored in a workflow. The Python code in the plugins is executed the same interpreter and execution environment as the rest of the platform. Thus, use this functionality to execute only code that is fully trusted. There is nothing preventing a plugin to run malicious code (think system.exec('rm -rf /'), so use at your own risk. To configure the execution of plugins follow these steps:
Create a folder at any location in your instance of OnTask to store the Python modules. OnTask assumes that each directory in that folder contains a Python module (that is, a folder with a file
__init__.pyinside).Open the administration page of OnTask as superuser and go to the section with title Data Upload/Merge Operations.
Select the Preferences section.
Modify the field Folder where plugins are installed to contain the absolute path to the folder created in your systems.
Make sure that the Python interpreter that is currently executing the Django code is also capable of accessing and executing the code in the plugin folder.
Restart the server to make sure this variable is properly updated.
To create a new plugin first create a folder in the plugin space previously configured.
Inside this new folder create a Python file with name
__init__.py. The file has to have a structure a shown inthe following template:# -*- coding: utf-8 -*- from __future__ import unicode_literals, print_function import pandas as pd # The field class_name contains the name of the class to load to execute the # plugin. class_name = 'OnTaskTestPlugin' class OntaskTestPlugin(object): """ Example of a class that implements the OnTask plugin interface. The objects of this class have to provide the following elements: 1. Field name: Plugin name show to the users. 2. Field description_txt: A string with the detailed description of what the plugin does 3. Field input_column_names: A potentially empty list of column names (strings). If the list is empty, the columns are selected by the userat execution time. 4. Field output_column_names: Non empty list of names (strings) of the columns to be used for the output of the transformation. 5. Field parameters: an optionally empty list with tuples with the following structure: ('name', type, [list of allowed values], initial value, help_text) These elements will be requested from the user before executing the plugin through a form. The conditions on these values are: - name must be a string - type must be a string equal to "integer", "double", "string", "datetime" or "boolean". - The list of values is to restrict the possible values - The initial value must be of the type specified by the second element. - Help_text a string to show as help text 6. Method "run" that receives: - a pandas data frame with the data to process - a string with the name of the key column that will be used to merge the result. - A dictionary of pairs (name, value) with the parameters described in the previous element. and returns a result Pandas data frame. This frame **must** have one column with the key column name provided so that it can be properly merged with the existing data. """ def __init__(self): self.name = 'Plugin Template' self.description_txt = 'Example of plugin description' self.input_column_names = list() self.output_column_names = ['RESULT 1', 'RESULT 2'] self.parameters = [ ('param string', 'string', ['v1', 'v2'], 'v1', 'help param string'), ('param integer', 'integer', [], None, 'help param integer'), ('param double', 'double', [1.2, 2.2, 3.2], None, 'help param double'), ('param boolean', 'boolean', [], True, 'help param boolean'), ('param datetime', 'datetime', [], '2018-05-25 18:03:00+09:30', 'help param datetime'), ('param datetime2', 'datetime', [], '2018-05-25 18:03:00+09:30', 'help param datetime'), ] def run(self, data_frame, merge_key, parameters=dict): """ Method to overwrite. Receives a data frame wih a number of columns stipulated by the num_column_input pair, the name of a key column and a dictionary with parameters of the form name, value. Runs the algorithm and returns a pandas data frame structure that is merged with the existing data frame in the workflow using the merge_key. :param data_frame: Input data for the plugin :param merge_key: Name of the column key that will be used for merging :param parameters: Dictionary with (name, value) pairs. :return: a Pandas data_frame to merge with the existing one (must contain a column with name merge_key) """ # Extract the key column from the given data frame result = pd.DataFrame(data_frame[merge_key]) # Process the given data and create the result result[self.output_column_names[0]] = 1 result[self.output_column_names[1]] = 2 return result
The menu Dataops at the top of the platform includes the page Transform that provides access to the plugins and its invocation with the current workflow.
2.12. SQL Connections
One of the key functionalities of OnTask is to be able to merge data from multiple sources. Section Data describes the functionality available to perform these operations. Some of them, however, require special configuration from the tool administrator. This is the case when uploading and merging data from a remote database that allows SQL connections. These connections must be first defined by the administrator and are then are available to the instructors.
The screen to manage these connections is accessed clicking in the item SQL Connections at the top menu bar. This link is only available for those users with the administration role.
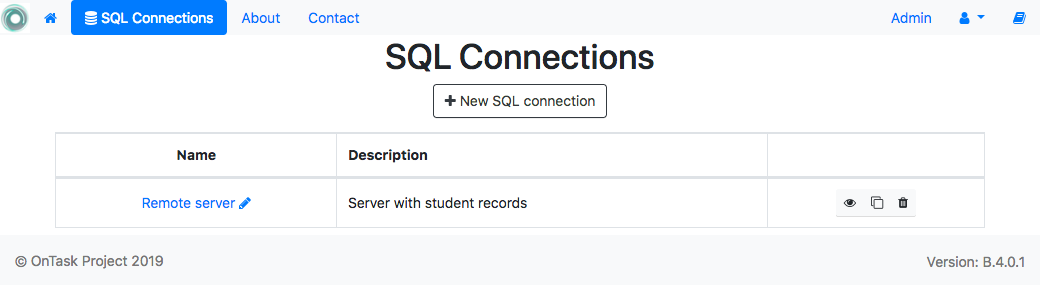
Each connection can be defined with the following parameters:
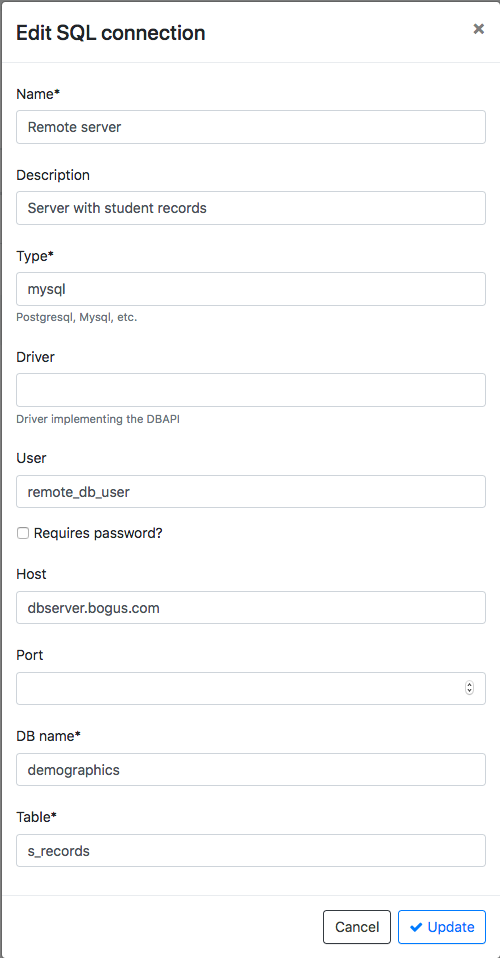
- Name (required)
- Name of the connection for reference purposes within the platform. This name must be unique across the entire platform.
- Description
- A paragraph or two explaining more detail about this connection.
- Type (required)
- Type of database connection to be used. Typical types include postgres, mysql, etc.
- Driver
- Driver to be used for the connection. OnTask assumes that these drivers are properly installed and available to the underlying Python interpreter running Django.
- User
- User name to connect to the remote database.
- Requires password
- Flag denoting if the connection requires password. If it does, the password will be required at execution time. This feature allows OnTask to avoid storing DB passwords.
- Host
- Host name or IP storing the remote database
- Port
- Port to use to connect to the remote host
- DB Name (required)
- Name of the remote database
- Table (required)
- Name of the table stored in the remote database and containing the data to upload/merge
Once a connection is defined, as described in SQL connection, all the data in the table will be accessed and loaded/merged into the current workflow.
The operations allowed for each connection are:
- Edit
- Change any of the parameters of the connection
- Clone
- Create a duplicate of the connection (useful to reuse configuration parameters)
- Delete
- Remove the connection from the platform.
2.13. Creating users in Bulk
OnTask offers the possibility of creating users in bulk through given the data in a CSV file through the following steps:
Create a CSV file (plain text) with the initial line containing only the word
email(name of the column). Include then one email address per user per line. You may check the fileinitial_learners.csvprovided in the foldersrc/scripts.From the
srcfolder run the command:$ python manage.py runscript initial_data --script-args "-d scripts/initial_learners.csv"
If you have the user emails in a file with a different column name, you may provide the script that name (instead of the default
emailusing the option-e:$ python manage.py runscript initial_data --script-args "-d -e your_email_column_name scripts/initial_learners.csv"
If you want to create user accounts for instructors, you need to specify this with the option
-iin the script:$ python manage.py runscript initial_data --script-args "-d -e your_email_column_name -i scripts/initial_learners.csv"