3. Using OnTask
Contents
In a nutshell, the idea behind OnTask is to help instructors, learners and designers to exchange data about what is happening in a learning experience to design and deploy personalized learner support actions. This last term, personalized support actions is purposefully vague to include any action that is offered to learners in different forms depending on personalized conditions. The typical workflow to use OnTask starts by uploading and combining available data about the learning experience, either extracted from some platform (LMS, video annotation, quizzes), provided by the learners (questionnaires), or captured by the instructors. The instructors then write simple rules to select a subset of students and create a resource (HTML page, a message, a visualization) so that its content depends on the data available for each learner. The following figure shows an illustration of this workflow:

Imagine a learning experience in which you want to provide three personalized messages to the learners. In the first week, you want to send a welcome email and personalize slightly the text of this message based on the student background (courses taken before this one). The second week you want to send some comments and suggestions about the participation in the forum and the text will depend on the measures of engagement obtained from the platform. The third personalized email will vary depending on the level of engagement with the videos in the course. The idea of these messages is that you want to change the text in the message for each learner based on the information stored in the table.
The main entity in OnTask is a workflow that contains a table with data about the learners and a set of actions. You first need to populate the table with data extracted from the learning environment. We assume that there several data sources (coming from the use of technology, self-reported by the students, or observed and reported by the instructors). These data sources are combined and stored in the table. Think of the table as a conventional excel sheet storing the information about the learners (one learner per row and a set of features about each learner as columns).
The third entity in OnTask is the action that is either a set of questions to collect information from the learner or a text with elements that are selected or ignored based on conditions that are evaluated with respect to the learner student features stored in the table. This text can be included in an email, made available through a web page, or forwarded to another system for further processing.
In the remainder of this section we will use a initial workflow that can be downloaded and imported to your collection of workflows in OnTask.
3.1. Workflow
“But anyone who has experienced flow knows that the deep enjoyment it provides requires an equal degree of disciplined concentration.” -― Mihaly Csikszentmihalyi
After logging into OnTask, the users sees the home page showing the collection of workflows available to the user as shown in the following figure.

The navigation through the platform is done using the links in the top menu bar. The Home icon in the left side of the menu brings the user back to the page showing the available workflows. The book icon in the upper right side of the menu bar opens the documentation page, and the user icon provides access to the user profile (name, last name, bio, password and authentication tokens).
The Home page offers the following operations:
New workflow opens a dialog to set the name and description of a new workflow and then show the page to upload data in the table.

Import workflow opens a dialog requesting a workflow name and a file containing a previously exported OnTask workflow as shown in the following figure:

This page also shows those workflows previously created by the user. Each workflow is shown as depicted in the following figure.

The icons in the bottom of this element allow you to perform the following operations:
Open the workflow selects the workflow for further manipulation. Once selected, workflow name is shown under the top navigation bar as illustrated in the following figure.

When a workflow is open, the top-bar menu appears with the structure shown in the following figure.

The menu contains the following links:
- Home
Link back to the home page showing the workflows available for manipulation.
- Actions
Create, edit and execute actions.
- Table
Operations to visualize and manipulate the table (search for values, add a row, add a column)
- Settings
Additional operations to view:
- Workflow operations
This page contains links to export, rename, clone, flush the data, or delete the workflow. It also allows you to manipulat a set of attributes, and add users to share the workflow.
- Column operations
This page shows information about the columns in the workflow.
- Scheduled actions
Shows which actions have been scheduled for execution.
- View logs
A table showing the history of operations performed on this workflow
- User profile
Link to the user profile and logout
- Manual
Link to the OnTask manual (this document)
Once you open a workflow, the platform locks it so that no other user can manipulate it (see sharing a workflow). The lock is release if the user goes back to the home page, logs out, or the session expires. If you access a workflow and another user is currently using it, the platform will tell you that is locked and show who is holding the lock.
Change name or description changes the name of the description given to the workflow.
Create a duplicate or exact copy of the workflow with the prefix Copy_of_ added to the workflow name.
Delete all data and actions stored in the workflow (turns it into an empty workflow with just the name and the description).
Delete the workflow from the system.
3.2. Data
“May be stories are are just data without a soul” – Brené Brown
This section describes the operations to either upload the first set of data into the table, or merge additional data with the one already stored. This step may be done automatically before you work with a workflow. If this is the case, you may skip this section or revisit it when you need to manipulate the existing data.
The data operations are divided into three categories: upload operations, merge operations, and plugin execution. All of them, together with the possibility of removing the data in the table are shown in the pull-down menu with name Manage table data.
If the workflow table is empty, OnTask will request the parameters required to upload data from a given data source. On the other hand, if the workflow table already contains data, OnTask will request the parameters to perform a merge operation in which the existing data is combined with the data extracted from the given source.
3.2.1. Upload Data
These operations are provided to upload the initial set of data into the workflow table using a variety of sources.
3.2.1.1. Upload CSV Files
CSV or “comma separated value” files are plain text files in which the first line contains a comma-separated list of column names, and every subsequent line contains the values of these columns for each row. It is a popular format to exchange data that can be represented as a table (Microsoft Excel allows to save one sheet in a spreadsheet file into this format). The following figure shows the first step to perform this operation.
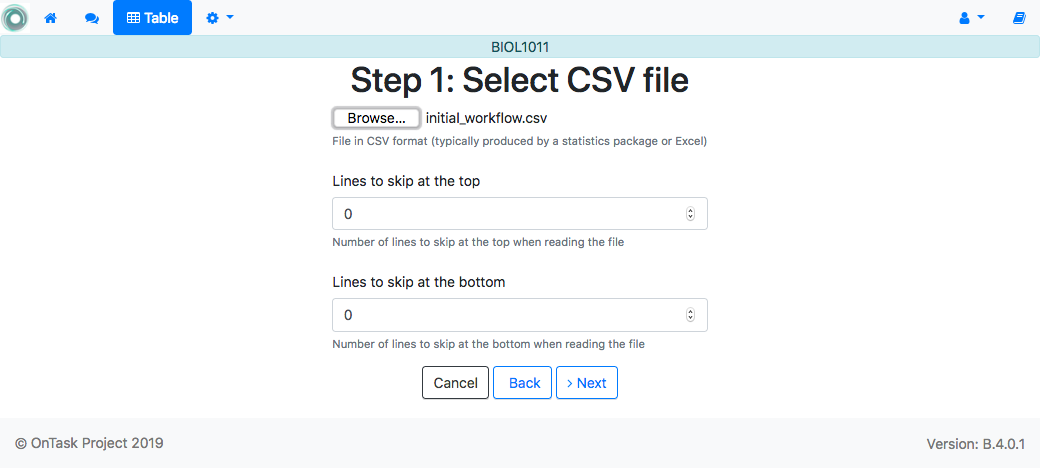
In some cases, the file with comma-separated values contains several lines at either the top or the bottom of that need to be skipped when processing the data. The page to upload the CSV file allows you to specify the number of lines to skip at the start and end of the file.
3.2.1.2. Upload Excel Files
OnTask is also capable of uploading the data from one sheet of a Excel file. The following figure shows the first step to perform this operation.
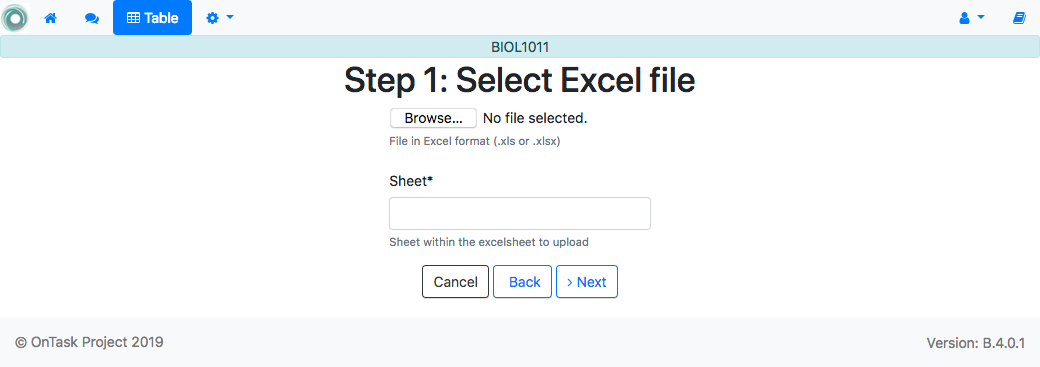
In this case the file is assumed to have multiple Sheets and one of them has to be selected to upload the data.
3.2.1.3. Upload Google Spreadsheet Files
OnTask allows you to upload a data table stored in a Google Spreadsheet that is publicly accessible.

3.2.1.4. SQL connection
This operation uploads the data into the current workflow table using a SQL connection to a remote database. These connections have to be previously defined and configured by the system administrator. Instructors can use them to access the content of a previously defined table in a remote database. Once selected, the platform shows the SQL connections available and the possibility to view the connection parameters (click on the connection name), or Run the connection to upload the data as shown in the following figure.
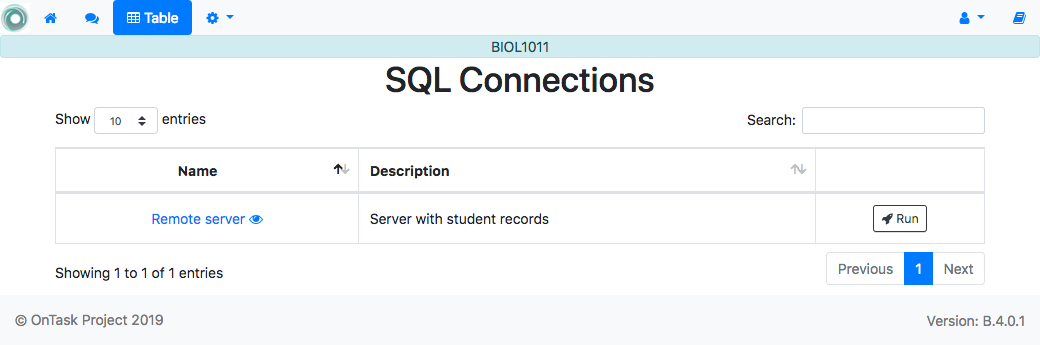
When running a SQL connection the platform shows the configuration parameters and requests the password to access the remote database (if required).

3.2.1.5. Confirmation step to upload data
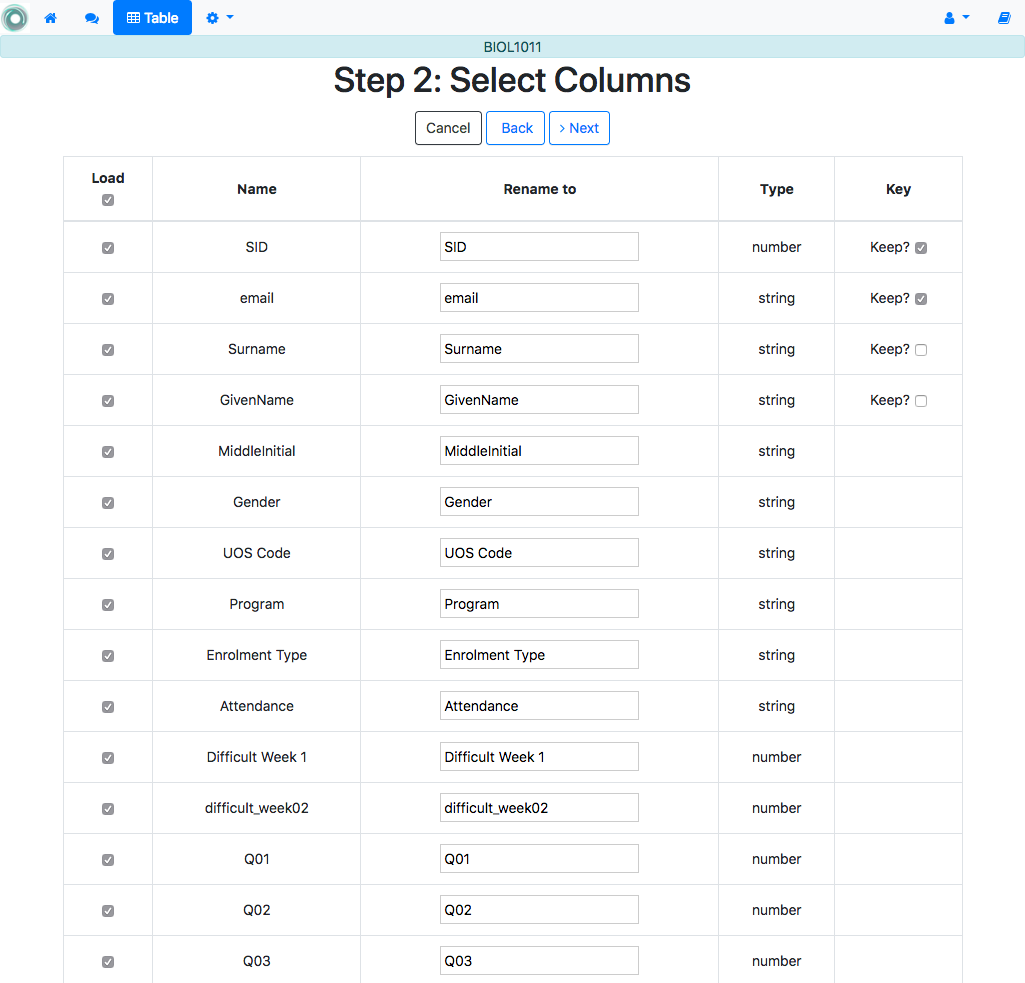
When uploading data for the first time, the values are prepared to be assigned as the initial content of the workflow table. But before this assignment is done, the platform needs you to verify some information. Upon reading the new data, OnTask will automatically detect the data type in each column and those columns that have unique values (no repetitions) and mark them as keys. Key columns are very important because their values (as they are different for every row) are required for several operations. The workflow table must have at least one key column. If here are several columns with this property, OnTask allows you to *unmark* some of them as non-key as long as there is always one of them wih such mark. Additionally, you may mark any column as a key column if the values are all different. The operations to manipulate column information is described in the section Workflow Operations.
Before finishing the upload step and storing the data in the table, OnTask also allows you to change the name of the columns or change the Key attribute as shown in the following figure.
After this step the data is stored and the platform shows the Table page.
3.2.2. Data Merge
A merge operation is executed when data is uploading and the workflow already has data in its table. Although this operation is common in data science contexts, it has several variants that make it challenging to use properly. These variants derive mostly from the method used to specify how the values in the new columns are matched with respect to the ones already existing in the table. In other words, each new column has a set of values, but they need to be in the right order so that the information is matched appropriately for every row. For example, if the table contains a column with the age of the learners, and a new column with the gender is merged, the rows of the new column need to correspond with the learners in the existing table. The way to address this issue is to use a key column* in the existing table and another ** key column in the new data. These columns uniquely distinguish each row with a value so they are used to make sure that the information for the rows with matching values in these columns are merged. These operations are executed in a set of additional steps. The first step of the merge operation is identical to the upload operation. After detecting the column data types, the key columns and offering the option of changing their names, the next steps identify the key columns to use in the merge, the variant to merge, and shows a summary of the changes that will result from the operation.
3.2.2.1. Step three: select keys and merge option
The following figure shows the third step of the merge operation.

The form requires the following fields:
- Key columns
- A key column in the external table about to be merged and a key column in the existing table (both fields are required).
- Merge method
- After choosing a merge method, a figure and explanation are shown below.
There are four possible merge variants:
Select only the rows with keys in both existing **and new table**. It will select only the rows for which values in both key columns are present. Or in other words, any row for which there is no value in either of the key columns will be dropped.

Select all rows in either the existing or new table.
All rows in both tables will be considered. You have to be careful with this option because it may produce columns that are no longer unique as a result.

Select the rows with keys in the existing table.
Only the rows in the new table with a value in the key column that is present in the existing table will be considered, the rest will be dropped.

Select the rows with keys in the new table.
Only the rows in the existing table with a value in the key column that is present in the key column from the new table will be considered, the rest will be dropped.

In any of these variants, for those columns that are present in both the existing table and the new table, the values of the second will update the existing ones in the first. This update may introduce non-values in some of the rows (for example in columns for with the new data does not provide any value). Additionally, extra care needs to be taken when performing this operation as some of the merge variants may eliminate data in the existing table. In the extreme case, if you try to merge a table with a key column with no values in common with the existing key and you select the method that considers rows with keys in both the existing and new table, the result is an empty table.
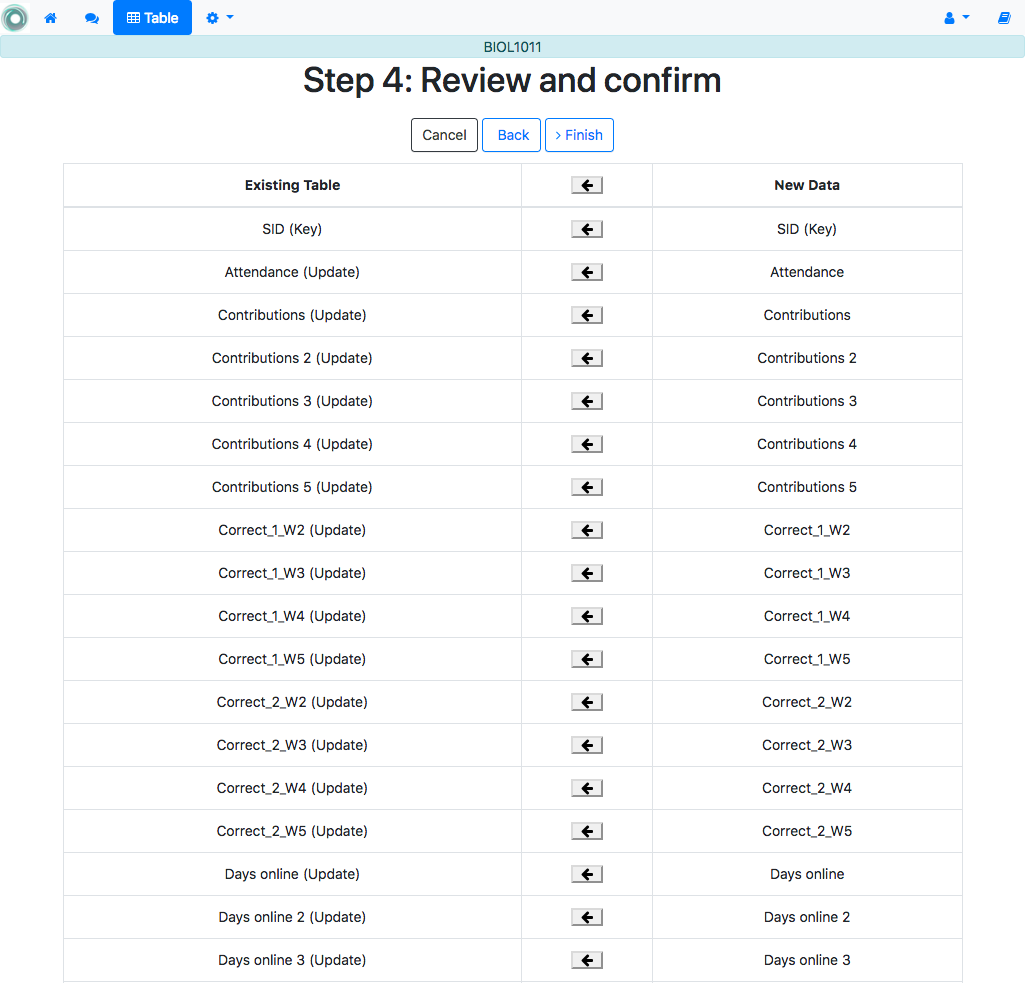
3.2.2.2. Step four: verify upcoming changes
After selecting these parameters the last step is to review the effect of the operation and proceed with the merge as shown in the following figure.
3.3. Table
“You’re here because you know something. What you know you can’t explain, but you feel it” – Morpheus, The Matrix
The information stored in the workflow table is accessed through the Table link in the top bar menu. These pages show the values stored in the workflow table. As this table can be arbitrarily large, OnTasks groups the rows into pages and offers the possibility to choose how many rows are contained in each page, as well as links to each of the pages. If the table has a large number of columns, a horizontal scroll is available to show the additional content. The order of the columns in the table can be changed by dragging them from the top row and dropping them in a new position.
The following figure shows an example of the main table page.

The table also offers the possibility of searching for a value. The given string is used to search all the columns in the table.

The buttons at the top of the page offer the following functions:
- Row
- A form to introduce a new row in the table with one field per column.
- Column
- Add a new column to the table. The pull-down menu also allows to add a column with values calculated with a formula and using the existing values, or a column with random values (See Adding a column for a detailed explanation).
- Manage table data
- Menu to upload/merge data to the table (see Data for a detailed explanation), execute a plugin, or delete the data in the table.
- Views
- A view is a screen showing a subset of rows and/or columns in the table. Clicking in the Views link will take you to another screen to manage these views. The pull down menu offers links to access the subset of the table defined by the available views.
- Dashboard
- The dashboard shows a statistical summary for the columns shown in the table. This number may be too high, so you should consider using Table Views to reduce the amount of information shown in the dashboard.
- CSV Download
- This functionality downloads the data in the table as a CSV file. Combine this functionality with the Table Views to handle large tables.
The left-most column in the table shows the operations to manipulate a row:
- Edit content
- This link opens a form with one field per column to modify the values in the row. The key columns are shown but not allowed to be changed.
- Dashboard
- A dashboard showing the population measures for all the columns and a mark showing where are the values for this row.
- Delete
- Delete the row from the table.
3.3.1. Table Views
Due to the potentially large size of the workflow table in either number of rows or columns, OnTask offers the possibility to define views. A view is a table that shows a subset of columns and rows of the original table. You may define as many views as needed. The link Views in the main table page shows the views available and the operations to manage them.

The buttons at the top of the page offer the following operations:
- Full Table
- Go back to the page showing the entire data table.
- Add View
- Create a new view
When creating a view you need to provide a name (required), a description, a subset of columns to show (at least one of them must be a key column), and an expression to select a subset of rows. This expression is evaluated with the values of every row and if the result is True, the row is included in the view. The following figure shows an example of the information that is included in the definition of a view.

Once a view is created, the following operations are available:
- Edit
- Click in the view name to edit its elements (name, description, set of columns to show and row filter)
- Show
- Show the subset of the table selected by the view
- Clone
- Create a duplicate of this view with the prefix Copy_of added to its name. This operation is useful to create a new view with content that is similar to an already existing one (clone and edit).
- Delete
- Delete the view.
The page to show the subset of the table defined by the view is identical to the full table view, but the table is restricted to the appropriate columns and rows. The view shown in the previous figure defines a subset of 12 columns of the table that is rendered as shown in the following figure.

The Dashboard and CSV Download buttons, when used while in a view, will apply to the selected data subset.
3.4. Actions
“In order to carry a positive action we must develop here a positive vision” – Dalai Lama
This is the most important functionality of the platform. Actions are used exchange information with the learners or other platforms, either through personalized information, or requesting data through a survey. A workflow contains a set of actions shown when selecting Actions page in the top-bar menu. The next figure shows an example of the actions available in one workflow.

The buttons at the top of the page offer the following operations:
- Action
- Create a new action in the workflow. The form requires a name (unique for the current workflow), a description (optional), and the type of action. OnTask offers the following types of actions: personalized text, personalized Canvas email, personalized JSON, and surveys.
- Import action
- Upload an action previously downloaded from another workflow.
The actions in the workflow are shown in a tabular format. For each action the following main operations are offered:
- Edit
- Click in the name action to edit its content.
- Run
- Use the action to either provide personalized content or run a survey (see Running actions for more information)
- URL
- Provide access to learners to the content of the action through a link (only available for actions of type Personalized Text)
- ZIP
- Download a ZIP file with as many files as selected learners in the action. Each file contains the personalized document for the learner (only available for Personalized Text actions)
- Schedule
- Schedule the execution of the action for some time in the future
- Rename
- Edit the name and description of the action.
- Clone
- Create an exact duplicate of the action adding the prefix “Copy_of” to its name.
- Export
- Download a file containing the definition of the action suitable to be uploaded into another workflow.
- Delete
- Remove the action from the workflow.
3.4.1. Personalized Text
These actions allow to create a document (similar to a HTML page) and mark elements (paragraphs, sentences, images) with conditions that will control if they are included or ignored when showing the document. The conditions are stated in terms of the columns of the data table. Think of this personalized content as a resource (message, tip, comment) you would offer learners but with content that is different depending on the data stored in the table. You may have several of these actions prepared to be used at different points during a learning experience. The personalized text action is manipulated with the screen shown in the following figure:

The screen has three tabs: the left one contains the editor, the center one the definition of a filter (optional) to select a subset of the learners to consider for this action, and the right tab contains the conditions used in the text (if any).
- The Personalized Text HTML Editor (left tab)
This is a conventional HTML editor offering the usual operations (inserting text, headings, lists, links, images, etc.) Right above the editor window you have three pull down menus to: insert a column value in the text (a placeholder), use a condition to conditionally show the text currently highlighted, or insert a workflow attribute that will be replaced by the corresponding value.
- The conditions
The right tab contains the conditions. A condition is an expression that when evaluated with respect to the values in the table for each learner will either be True or False. These expressions are commonly used in other applications such as spreadsheets or programming languages. The following screen shows an example of the content of this tab with two conditions.

The button Condition at the top of the tab opens the form to define a new condition. Once created The buttons in the screen allow you to edit the expression, insert the condition to control the appearance of text in the editor (below), clone the condition, or delete it from the action.
Each condition shows the number of learners for which the expression in that condition evaluates to True (if this value is zero, it means that any text you include in the editor controlled by this condition will not appear for any of the learners), the name, description, and the defined formula.
The icons in the bottom of the condition element allow the following operations:
- Edit
- Open a form to edit the name, description and expression in a condition.
- Clone
- Create an exact duplicate of this condition with the prefix “Copy_of” added to its name. This operation is useful when creating a new condition with an expression very similar to an existing one.
- Delete
- Delete the condition from this action.
The following image shows an example of this condition.

The expression in the previous condition is shown under the title The text will be shown if and can be read as:
Correct_1_W4 equal to zeroThe first element is the column name
Correct_1_W4, followed by the equal sign, and then the constant zero. When evaluating this expression, the column name is replaced by the value from the corresponding to each learner. For example, if a given learner hasCorrect_1_W4equal to 3 the evaluation will transform the expression into \(3 = 0\) which is False. Another possible evaluation is if another learner hasCorrect_1_W4equal to zero. After substitution of the column by the values for the learner, the resulting expression is \(0 = 0\). In this case, the expression is True. Once defined this condition can be applied to a part of the personalized text. When creating the texts, the condition is evaluated with the values for each student. If the expression is true, the text is included, if not, it is ignored. This mechanism is at the heart of how OnTask personalizes the content of the actions. In the example above, the expression in the condition one of the learners in the data table.
- The filter
The center tab shows a filter. This element is an expression used to decide which learners (or more precisely, the corresponding rows in the data table that) will be selected and used in this action.

The filter element shows the name, description, and the formula defined. The icons at the bottom of the object provide access to the following operations:
- Edit
- Edit the name, description, and formula of the filter.
- Delete
- Remove the filter from the action.
When editing or creating a filter, the form shows the information as in the following figure:

The expression in this condition is shown under the title The text will be shown if and can be read as:
Video_1_W4 = 0 or Video_2_W4 = 0The first element of the expression is the sub-expression
Video_1_W4 = 0which contains the variableVideo_1_W4, the equal sign, and the constant zero. The second element is a sub-expression with the variableVideo_2_W4, the equal sign, and the constant 0. These two sub-expressions are connected through the OR operator, which means that the expression will be True if either of the sub-expressions are True, and False in any other case. When evaluating this expression, the variables are replaced by concrete values (numbers). For example, ifVideo_1_W4is replaced by 3, andVideo_2_W4is replaced by 4, the evaluation will transform the expression into \(3 = 0 or 4 = 0\). The sub-expression \(3 = 0\) is clearly False and so is the other sub-expression \(4 = 0\). This means the initial expression is False. result is either True or False. Another possible evaluation is ifVideo_1_W4is equal to zero (andVideo_2_W4remains equal to 4). In this case the resulting expression is \(0 = 0 or 4 = 0\). In this case, the first sub-expression is True, and although the second is False, only one is needed for the overall expression to be True.These conditions can have nested sub-expressions and get complex fairly quickly. However, the underlying mechanism to evaluate them remains the same: replace variables with values and decide the result (True or False). OnTask relies on these expressions to personalize the content of the actions.
The buttons at the bottom of the page offer the following operations:
- Preview
The Preview button shows how the text in the editor is shown for those learners selected by the filter (if any). After clicking in the button you will see a window with the resulting text. If there are any elements in the text that are controlled by any condition, the bottom area will show their values.

Use the arrow buttons to see all the different versions of the text depending on the values stored in the table for each learner.
- Save
- This button saves the content of the text editor and continues in the same editor page.
- Close
- This button saves the content of the text editor and returns to the page showing all the actions in the workflow.
3.4.1.1. Using column values, attributes and conditions in a Personalized Text
As previously described the Personalized Text Editor may include three per-learner personalized elements: an attribute name, a column name or a portion of text marked with a condition.
- Attributes
Attributes are simply synonyms that you may want to use in more than one action. For example, if you have several actions that include the name of a course, instead of including that name if all actions, you may define an attribute with name course name and value Biology 101 and include in the actions the attribute name. OnTask will replace that attribute with its value when showing the text to the learners. If you then change the name of the course (or you export this workflow and import it to be used in another course), you only need to change the attribute and the name of the course will appear correctly in all actions (in what is called a single point of change).
To insert an attribute name in the text simply place the cursor in the editor where you want the value of that attribute to appear and select the attribute from the area above the editor. The name of the attribute will be inserted in the text surrounded by double curly braces, (for example
{{ course_name }}. Only the attributes you previously created in the details page are available.- Column names
- The other element that can be personalized is a column name. For example, suppose you have a column in your table with the first name of the learners. You can use the column name to personalize the greeting in the text. To insert a column name, you follow the same steps used for the attribute but this time you select the column name from the pull-down menu. You will see that the name of the column appears in the text also surrounded by double curly braces (for example
Hi {{ GivenName }}. The double curly braces is the way OnTask has to mark that text to be personalized or replaced by the corresponding value for each learner extracted from the data table. - Conditional text
Using a condition to control if a portion of the text is shown or ignored is slightly different. You need to first highlight the text you want to appear depending on the condition in the editor. Then click in the pull down menu Use condition in highlighted text and select the condition to use. The text will be surrounded by two marks. For example if the condition name is
No Video 1, the text you highlighted will appear in the editor after clicking in the Insert in text as:{% if No Video 1 %}You need to review his week's video{% endif %}
This format marks the message You need to review this week’s video to appear only for those learners for which the condition
No Video 1evaluates to True with their current values in the data table. Otherwise, the text will be ignored. The following figure illustrates this process.
3.4.2. Surveys
The personalized text actions described in the previous section makes information available to the learners. The survey actions perform the operation in the opposite direction, they collect information from the learners and store it in the table. This functionality can be seen as a simplified version of other survey engines such as Google Forms, SurveyMonkey or Qualtrics. In a learning context a survey can be used by the learners to submit certain data, or by the instructor to collect annotations about learners throughout the experience. OnTask supports these two modalities.
The edition of a survey action is done through a page with three tabs. The following figure shows an example of this page.

The information collected for each question will be represented in the table by a column. The editor page allows you to use any of the existing questions to be included in a survey. The three tabs in the screen offer the following functionality.
- Survey Questions
The tab in the left shows the questions that are contained in the survey. The two buttons at the top of the screen allow you to either insert an existing question (the pull-down menu will show all the column names available in the table) or create a new question. When creating a new question, the following form is used:

The field Question name will be used internally as the column name in the table. The Description field is the text shown to the learners next to the question. If the question includes a set of values allowed, the form available to the students will collect the answers using a pull-down menu with the given choices.
As with other tables in OnTask, if the number of elements (in this case questions) is too large, they will be divided into pages with a link to access each page, and the content of the questions is searchable.
- Filter Learners
- The central tab in this screen is identical to the filter in the personalized text action. The tab allows to include an expression to decide if a learner is included or not in the survey. This survey has no filter defined.
- Survey parameters
The tab in the right of the screen shows the additional parameters to deploy the survey. More precisely the screen allows to define the text that is shown at the top of the survey (Survey description), the key column used to identify the users, and if the questions should be shown in different order for each user.

The Preview button at the bottom of the page shows the content as it will be shown to the learners.

3.4.3. Personalized JSON Object
This type of action allows the creation of a JSON object with content that is personalized with the same functionality as described in the section about Personalized Content. The difference is that instead of creating a text, the action creates a JSON object that will eventually be sent to another platform for further processing. This object is also a resource that is different for every student but the difference is that instead of being prepared to be visualized, it is packaged with a structure suitable to be received by another platform through a URL.
The screen to create a Personalized JSON object is shown in the following figure.

The tabs have the same functionality than in the case of personalized text.
- Personalized JSON Object
- This tab contains a plain text editor to describe the structure of the object and insert column values, attribute values or use conditions to control the presence of elements in the object.
- Filter Learners
- This tab allows the definition of an expression to select a subset of rows in the table for processing.
- Text Conditions
- This tab contains the conditions that can be used within the body of the JSON object to select content (in exactly the same way as in the personalized text).
The text shown in the previous figure defines a JSON object with three fields sid, midterm_total and msg. The first two contain column names that will be replaced by their corresponding values. The field msg will include one of the two messages depending on the value of the conditions.
The field Target URL is to introduce the URL where the object will be sent.
The preview button in the personalized JSON action shows the resulting object after verifying that the structure after evaluating the corresponding expressions is a valid JSON object.
3.4.4. Personalized Canvas Email
This type of action is only available if OnTask is appropriately configured to communicate with a Canvas Learning Management System. The creation of this type of action is almost identical to the Personalized Text. The action is created selecting the corresponding action type as shown in the following figure.

The page to edit this action is almost identical to the one to edit a Personalized Text actin.

It contains three tabs: Personalized Canvas Email, Text Conditions and Filter Learners. The last two, Conditions and Filter Learners offer the same functionality. The Personalized Canvas Email allows the creation of a plain text message (no HTML markup is allowed).
3.4.5. Running actions
Once an action has been created, it can be run. The meaning of this term is different for the various types of actions supported in OnTask.
3.4.5.1. Sending personalized emails (Personalized Text Actions)
Once you created a personalized text action and verified its content using the Preview button, save its content. The right-most column has a button with name Run.

If selected, the next page is a form requesting information about how to send the messages to the learners. The next figure shows an example of this page.

The fields in this form are:
- Email subject
- A line to be included as subject of all the emails.
- Column to use for target email address
- OnTask needs to know where to send the email. It assumes that you have a column containing that information for each learner and it needs you to select that column.
- Comma separated list of CC emails
- A comma-separated list of emails to include in the carbon copy or CC email field.
- Comma separated list of BCC emails
- A comma-separated list of emails to include in the blind carbon copy or BCC email field.
- Check/exclude emails
- If selected, this option inserts an extra step in which you can eliminate certain emails form the action. This feature is useful to remove certain emails that cannot be removed with the filter.
- Send you a summary message
- If you select this option OnTask will send you an email with the summary of this operation (number of rows in the table that were selected by the filter, number of emails sent, date/time of the operation, etc.
- Track email reading
- Include in the messages a HTML snipped to detect if the email is read. OnTask adds an extra column to the table to store the number of times the message is opened. This detection relies on how the email client opens the message and processes the included images, therefore, the information in this column may not accurately reflect this information.
- Snapshot of the workflow
- If you select this option, after the emails are sent, the platform returns you a file that contains a snapshot (picture) of the workflow. It basically freezes the content of the workflow and places it in a file given to you. You may take this file and import back the workflow. In this new workflow you can check the values and messages at the time the operation was executed.
If the option to Check/exclude emails has been selected, clicking in the Next button leads to a page where the list of emails is shown and the user can select some of them to remove from the operation. If this option is not selected, the operation to send the emails is sent to a queue for processing. The browser will show the record that contains the information about the status of this request.
3.4.5.2. Making personalized content available to learners
Sending a personalized text is just one possible way to make this content available to learner. Another one is to offer the content through a URL that can be given to the learners. To enable such URL click in the icon with three dots in the right most corner of a personalized text action.
You will see an operation labeled URL followed by either the word (Off) or (On). Select that operation. The following window shows the URL in which the content is available as well as the field to enable/disable it.

In order for the learners to be able to view their personalized content, they have to be users of the OnTask platform and their ID present in the data table. This functionality is conceived for a context in which OnTask authenticates users either through a corporate Single-sign on layer, or learners access the OnTask through the Learning Management System with a LTI interface (see Authentication).
3.4.5.3. Running a survey
After creating a survey action it can be used in two modalities: run by the instructor, or given to the learners to fill out the data. The first modality is used as a mechanism to capture instructor observations. For example, surveys run by the instructor can be used as an attendance capturing mechanism (if the instructor has a device or procedure to capture who is in attendance). If the Run operation is selected, OnTask shows a table with the learners selected for the action, and the values for the survey collected so far.

Each row contains the identifier of the student (in the previous table, the email) as a link. Instructors may click in a link available to enter the survey information or modify the already existing information for that learner.

After entering the information the list of students for which the data entry is still allowed.
3.4.5.3.1. Making the survey available to the learners
The second operation available for survey actions is to make available the URL to learners so that they individually enter the information themselves. The right-most column of the action table contains an icon with three dots that if selected shows a set of additional operations, and one of them has the text URL. If selected OnTask shows the URL for the survey, the possibility of enable/disable it, or even provide a date/time window for its availability.

Once enabled, you may send the URL to the students (you may even use a personalized text action for that). Once the students click in the action, and if they are allowed to connect to OnTask as basic users, after authentication, if their email is part of the table, they will see a form with the survey questions and after answering it, the values are automatically stored in the right row and column in the table.
These two survey actions are ideal to collect information about any aspect of a learning experience in a way that is centralized and available for further processing through personalized text actions. For example, users may choose from a predefined set of topics those that were more challenging. This information can then be used in a personalized text action to provide the adequate resources to each learner.
3.4.5.4. Sending personalized emails in Canvas
The execution of a Personalized Canvas Email action requires additional information as shown in the following figure:

- Column in the table containing Canvas ID values
- This column is essential to send the emails to the platform as it is used to uniquely identify every Canvas user. The data can be obtained downloading the marks of a course as a CSV file and uploading/merging this column with the existing table.
- Email subject
- The text to use as subject for the messages.
- Canvas Host
- If there is more than one Canvas platform configured in OnTask, an additional pull-down menu will appear to select which one to use. If there is a single Canvas platform configured, it will be used by default and this field will not be shown in the form.
- Check/Exclude Canvas IDs before sending messages
- If this option is selected OnTask adds an extra step to check the identifiers that will be used and offer the possibility of excluding some of them.
- Download a snapshot of the workflow
- If selected, a snapshot of the workflow (data and actions) will be downloaded after the messages have been queued for delivery.
After introducing this data, OnTask will check if it has credentials for the user to access Canvas through its API. If not, the user will be redirected to a page in the Canvas Learning Management System to 1) authenticate, and 2) authorize OnTask to access the platform. If these steps are successful, the user is redirected back to OnTask and the messages are delivered. The credentials retrieved from Canvas will be reused for future executions of this action.
3.4.5.5. Sending personalized JSON objects to another platform
The operation to Run a personalized JSON action sends the objects resulting from the personalization to the given URL. The page to collect the information to run these actions is shown in the next figure:

The first field is the column to perform a last review of the elements to send and select some of them to exclude in an extra step. If the field is empty, this step is skipped. The second field is the token to use for authentication when sending the JSON objects to the URL given when editing the action. This operation assumes that such token has already been obtained and provides no additional functionality to execute that step as part of this operation.
Similarly to the email actions, once these fields are provided, the operation to send the JSON objects to the target URL is queued in a batch system for processing. The browser shows the record where the status of this request is reflected.
3.4.6. Creating a ZIP file with the personalized text
The personalized text actions offer the possibility of creating a ZIP file containing one HTML file with the personalized text for every learner. The execution of this operation requires the use of two columns in the table and a suffix to create the file names. The operation is available clicking in the icon with three dots in the right-most column of an action in the action page. The additional information is requested through the form shown in the following figure.

The first part of the file name is taken from the values of a key column. The second part of the file name is taken from a second column (optional). Additionally, the user may include a third suffix to be used for the last part of the file name (if none is given the default suffix is feedback.html. For example if the first column has the values submission 01, submission 02, submission 03, the second column has the names John, Paul, Mary, and the file suffix is empty, the ZIP file will be created with three HTML files with names submission 01_John_feedback.html, submission 02_Paul_feedback.html and submission 03_Mary_feedback.html.
3.4.6.1. Uploading feedback files for a Moodle Assignment
One of the potential uses of the ZIP file generated from a personalized text action is to upload each file as personalized feedback of an assignment in a Moodle course. However, there are some requirements in the file names so that they are uploaded each to the appropriate location, namely:
- The table must have column named
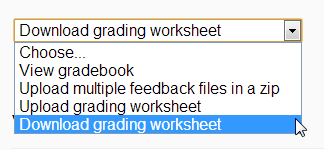
Identifierwith values starting with the wordParticipantfollowed by a white space and a unique number. This column can be extracted from a Moodle Assignment by downloading the grading worksheet:
The CSV file has two columns with names
IdentifierandFull name.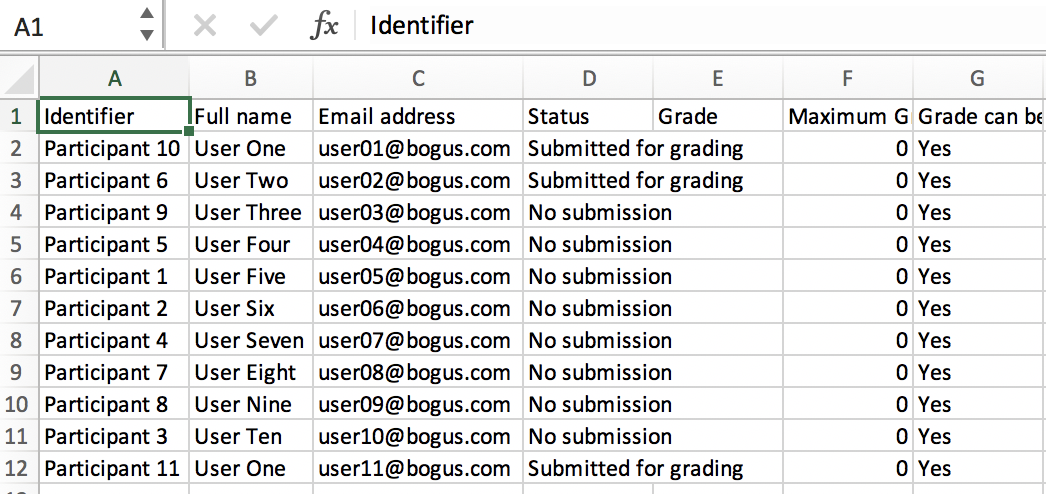
The two columns
IdentifierandFull namemust be merged with the current data in the workflow.Choose the column
IdentifierandFull nameas the first and second column respectively when generating the ZIP file. Make sure you select the optionThis ZIP will be uploaded to Moodle as feedback.Upload the resulting ZIP using the option
Upload multiple files in a zipin the Moodle Assignment.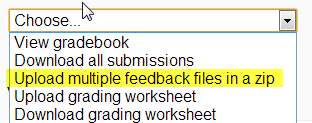
3.5. Workflow Settings
In addition to the operations described in the previous sections to upload and merge data, create actions, and run these actions, there are additional operations for the workflow that can be accessed through the Settings pull-down menu in the top-bar menu. The settings pages offer information about: workflow operations (export, rename, clone, etc.), column operations (change column type, rename, clone, etc.), scheduled actions, and view logs.
3.5.1. Workflow Operations
“The details are not the details. They make the design” – Charles Eames
The Workflow Operations page is available through the Settings link at the top-bar menu. The page shows the information as illustrated by the following figure.

The buttons at the top of the page offer the following operations:
- Export
This functionality allows you to take a snapshot of the content of the workflow and store it in a file for your records. You may select which actions are included in the exported file

The menu offers the possibility of exporting only the data, or the data and the action in the workflow.
- Rename
This functionality allows to change either the name or the description of the workflow.

- Clone
- This function creates a new workflow duplicating the data, actions and conditions of the current workflow. The new workflow will have the same name with the prefix Copy of.
- Flush data table
This operation deletes all the data attached to the workflow, but preserves the workflow structure (that is, the name and the description only).

Given the destructive nature of this operation the platform requires you to confirm this step.
- Delete
Operation similar to the previous one, but now the whole workflow is deleted and therefore unselected. If executed, the platform will go back to the list of workflows as this one is no longer available for operations.

As in the previous case, the platform asks for confirmation before carrying out the delete operation.
In addition to the buttons at the top, the Workflow Operations page offers two additional operations shown in separated tabs.
- Attributes
This tab shows the operations to manage a dictionary of pairs
(name, value). The names can e used in personalized text and they are replaced by thevalue.
The Attribute button opens a form to introduce the name and value of a new attribute. The table below this button shows the attributes available for the workflow. The name of the attribute is a link that opens the form to edit its content. The icon on the right deletes the attribute.
The use of these attributes is to facilitate a single point of change when a value appears in multiple locations. For example, every personalized text actino is singed with the name of the instructor. If that name changes, all actions need to be edited. On the other hand, if the actions contain the name of an attribute, just changing the attribute value propagates the change to all actions.
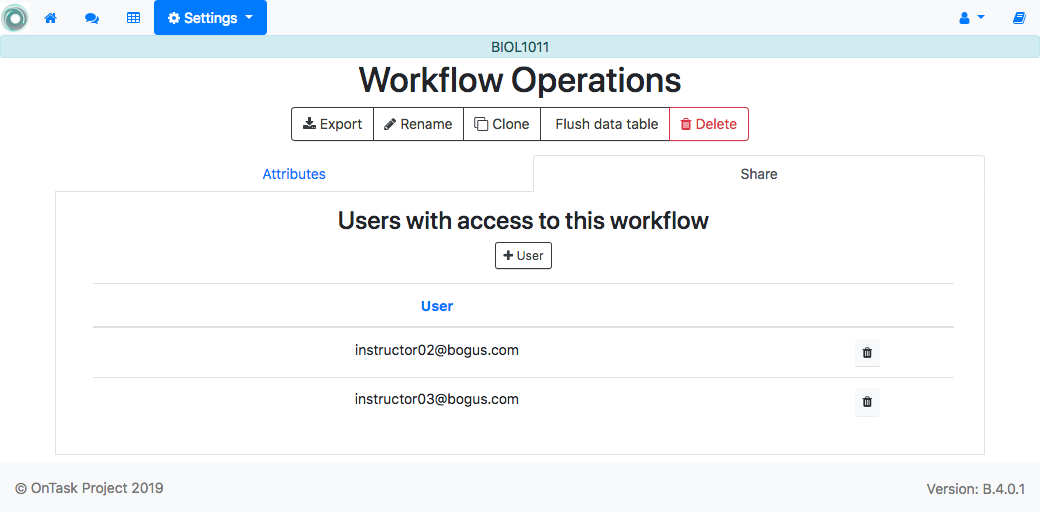
- Share
The Share tab on the right of the page is used to manage the list of users that have access to this workflow. The User button opens a form to introduce a the id of the user to share the workflow.
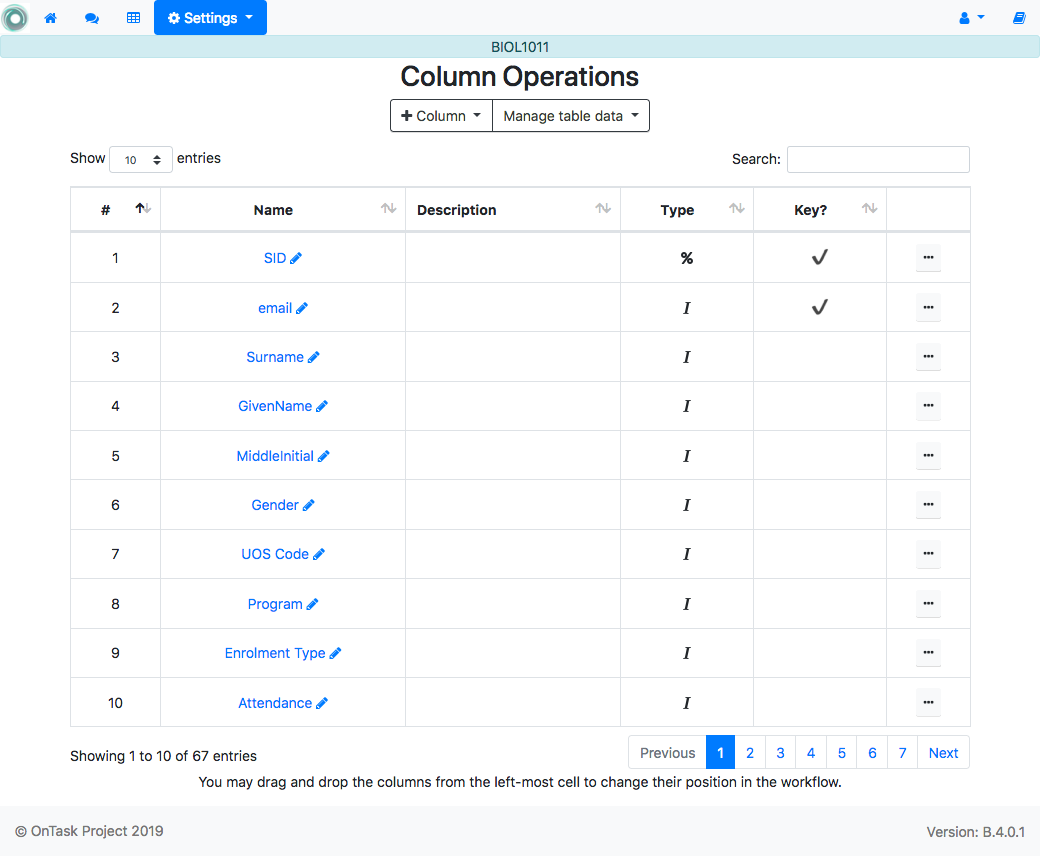
3.5.2. Column Operations
The Column Operations page is available through the Settings link at the top-bar menu. Columns in OnTask have substantial information and operations that is condensed in this page. The information is shown as illustrated by the following figure.
The buttons at the top of the page offer the following operations
- Column
- This menu opens three options: create a regular column, create a column combining the values of two existing columns, or create a new column with random values.
- Add a regular column
Opens a dialog to create a new column in the table with the following fields:

- Name (mandatory): column name (shown in the table)
- Description: text that will be shown to the learners if the column is part of a survey action.
- Data type (mandatory: The possible data types are number (representing both integers or real numbers), string, boolean (only possible values are true and false), and datetime (a date and time together).
- An integer (mandatory) representing the position of the column in the table (a value zero will insert it at the end of the table).
- Two date/time values to control the visibility of the column.
- Comma-separated list of possible values. This field is to restrict the values in the column. The values have to be compatible with the specified data type.
- Initial value to assign to all cells in the column.
- Add a formula-derived column
- This column is created by combining the values of existing columns using one of the operations addition, product, maximum, minimum, mean, median, standard deviation, conjunction or disjunction. The formula is only applied when the column is created the current values of the other columns. The column is not refreshed if the operand change in the future.
- Add a column with random values
- This is useful to create columns for A/B testing. The new column is created with a random value from either a numeric range (starting at 0) or a set of strings.
- Manage table data
- Menu to upload/merge data to the table (see Data for a detailed explanation), execute a plugin, or delete the data in the table.
Below the buttons to perform these operations the workflow columns are shown. If the number of columns is large, the information is divided into pages. The field at the top right of this list performs searches in all fields of all columns (name, type, etc). Each column has the following information (from left to right):
- Position
- A number starting at 1. The position is used when visualizing the table.
- Name
- Unique name for the workflow that cannot contain the quotes ‘ or “.
- Type
- One of integer, string, double, boolean or date/time.
- Key?
- Field stating if it is a key column, that is, the values are different or unique for all rows. OnTask detects automatically this property when the data for a new column is loaded. You may edit and change this properly as long as the two requirements are satisfied: the values have to be unique for all rows, and there must be at least one key column per workflow.
- Operations
The operations available for columns are:
- Edit
Available by clicking in the column name. It allows you to change the name, tunique and values allowed in the column. If the field Has unique values per row property is modified, OnTask checks if the values satisfy this condition.

The column may also have a validity window defined by two date/times. This validity is used when executing action in tasks.
- Clone
- Clones the column in the workflow changing its name adding the prefix Copy of to the name.
- Statistics (only for non-key columns)
- Shows a statistical summary of the values in the column. If the data type is number, the summary includes information about quartiles, a boxplot, and a histogram. For the rest of data types, the summary only includes the histogram.
- Restrict
- Assigns as allowed values for the column those currently stored. This operation is useful to transform a generic column into one with values limited to the current ones.
- Delete
- Deletes the column from the workflow. If there are conditions in the actions that use this column, those conditions will be removed from the action.
- Make first column
- Move this column to the first position in the workflow
- Make last column
- Move this column to the last position in the workflow
The position of the columns can also be changed by dragging by the number (left-most column) and dropping them in the new position.
3.5.3. Scheduled Actions
“I have no regular schedule. I get up whenever I can.” – Jimmy Wales
The personalized text, personalized canvas email and personalized JSON object actions can be scheduled to run at some point in the future. To schedule the execution of an action go to the Actions page from the top menu, click in icon with three dots in the right-most column of the action and select the operation Schedule.
3.5.3.1. Scheduling a Personalized Text Action
The following figure shows the information requested to schedule the execution of a personalized text action (sending emails to learners):

The fields in this form are:
- Name
- A name to identify this scheduling (a user may have several of these actions pending in a workflow)
- Description
- A brief description explaining this scheduled action (for example, “send reminder before the exam”)
- Column containing email
- The column in the table used to fill out the destination email. OnTask will check that the values in that column are proper email addresses.
- When to execute the action
- A date/time in the future when the action will be executed.
- Email subject
- The text to be included in the email subjects.
- Comma separated list of CC emails
- A comma separated list of emails to include in the carbon copy (or CC) field of the email.
- Comma separated list of BCC emails
- A comma separated list of emails to include in the blind carbon copy (or BCC) field of the email.
- Send confirmation email
- Select this option if you want a confirmation email sent to you.
- Track when emails are read
- Try to detect if the email is read. OnTask adds an extra column to the table to store the number of times the message is opened. This detection relies on how the email client processes the message, therefore, the information in this column may not be accurate.
- Check/exclude emails
- If selected, this option inserts an extra step showing the emails and offering the possibility to eliminate them from the action. This option is useful to perform a final check and remove emails that cannot be removed with the action filter.
3.5.3.2. Scheduling a Personalized JSON Action
The following figure shows the information requested to schedule the execution of a personalized JSON action (sending JSON object to another platform):

The fields in this form are:
- Name
- A name to identify this scheduling (a user may have several of these actions pending in a workflow)
- Description
- A brief description explaining this scheduled action (for example, “send reminder before the exam”)
- Column to select elements
- A column to show its values and allow to review and exclude some of the entries. This option is useful to perform a final check and remove entries that cannot be removed with the action filter.
- Authentication Token
- The string to be use to authenticate with the external platform.
3.5.3.3. Table with Scheduled Actions
The table showing all the action scheduling operations can be access through the Settings link in the top-bar menu selecting the Scheduled actions link. The list of scheduled actions is shown as illustrated in the following figure.

The operations available for each operation are:
- Edit
- This operation is accessed clicking in the name of the scheduled operation.
- Action name
- The link in this field opens the edit page for the action.
- Scheduled
- Time/date when the executing will take place
- Status
- Status of this execution
- View details
- View all the details for this scheduled execution (includes values in the payload)
- Delete
- Delete the scheduled execution.
3.5.4. View logs
The platform keeps a log of most of the operations that are executed when managing a workflow. These records are available through the View Logs link in the Settings pull down menu at the top-bar menu. The page shows information about the records in tabular form. The following figure shows an example.

The CSV Download button allows to download the logs in CSV format for further processing. Additionally, the content of the table is paginated and the links to access each page are shown at the botton. The records can be searched using the box at the top right corner of the table.
3.6. Plugins: Transforming the data with your own code
The additional method offered by OnTask to manipulate the data in a workflow table is to execute arbitrary Python code encapsulated as a Python module and placed in a predefined folder in the computer hosting the server. In the context of the platform, these Python modules are called Plugins or Transformations and require some previous configuration. Before their execution, a plugin must be written and installed in the folder previously considered for that purpose.
The purpose of the plugins is to allow arbitrary transformations of the data attached to a workflow such as machine learning algorithms, predictive models, etc. The list of plugins available for execution can be accessed through the link Execute plugin inside the drop-down menu Manage table data available in both the Actions and Table pages. The transformations available for execution are shown in a table like the one in the next figure.

Each transformation is shown with a the name of the internal folder in which it is installed, its (unique) name, a description, if it is ready to run, and the last time the code was modified (based on the file modification time). The link in the name opens a form to introduce the information required for execution. The following figure shows and example of this page.

The information requested in this page is divided into three tabs.
- Columns to pass to the transformation
- This field is to select the subset of columns from the data table that will be passed when invoking the transformation. It is possible for a transformation to define a set of fixed column names as inputs. If this is the case, the field in this tab shows those names and does not allow changes.
- Columns to store the result
- The middle tab in this page includes fields to obtain the output column names (the transformation may supply suggestions, an optional suffix to add to the result column names to be able to differentiate between multiple executions of the transformation, and a key column to be use when merging the result of the plugin with the current table.
- Parameters
- This tab contains a form to pairs (name, value) as defined by the transformation.
After the data has been provided the tool shows an transformation execution report showing the columns that will be created and how will they be merged with the existing data.
3.6.1. Plugin requirements
The Python modules installed in the predefined folder need to satisfy various requirements to be considered for execution within OnTask. More precisely, each plugin must be stored in its own folder (as a Python module). The file __init__.py in the module must contain:
Module variable
class_namewith the name of the class in the file that contains the required definitions.The definition of a class with the name stored in the previous variable.
Class field
namewith the plugin name to show to the users.Class field
escription_txtwith a string with the detailed description of what the plugin doesClass field
input_column_nameswith a potentially empty list of column names (strings). If the list is empty, the columns are selected by the user at execution time.Class field
output_column_nameswith a non empty list of names (strings) of the columns to be used for the output of the transformation.Class field
parameterswith an optionally empty list with tuples with the following structure:('name', type, [list of allowed values], initial value, help_text)These elements will be requested from the user before executing the plugin through a form. The conditions on these values are:
- name must be a string
- type must be a string equal to “integer”, “double”, “string”, “datetime” or “boolean”.
- The list of values is to restrict the possible values
- The initial value must be of the type specified by the second element.
- Help_text a string to show as help text
Class method
runthat receives:- a pandas data frame with the data to process
- a string with the name of the key column that will be used to merge the result.
- A dictionary of pairs (name, value) with the parameters described in the previous element.
an d returns a result Pandas data frame. This frame must have one column with the key column name provided so that it can be properly merged with the existing data.
If a plugin does not comply with these properties the platform shows a summary of these checks to diagnose the problem.

